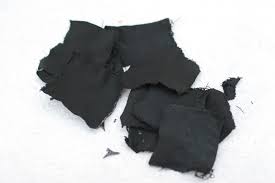
Char cloth is created using a natural fiber cloth, that is burned in an almost airtight environment. Burning the cloth this way prevents the cloth from burning into ash, and instead the cloth chars and stays intact. The result is a piece of cloth that will catch any spark and preserve it long enough to start a fire.
The best part about char cloth is that not only is it easy to carry around with you, but it is also easy to make! You only need a few materials to get started.
Materials:
1. natural fiber cloth
2. a container
3. a nail and hammer
4. a source of heat
The first thing you need to consider is the cloth that is going to become you char cloth. You need the cloth to be made out of natural fibers. This means you don't want any synthetic fibers like rayon or polyester. This is because synthetic cloth won't char, it will simply melt. Your best bet is cotton. Its very easy to find because its used widely in clothing and modern textiles. Remember though, it has to be 100% cotton because those synthetic fibers.

When I made my own char cloth, I followed a suggestion I had seen to use jean. Jean is made from 100% cotton, so it works a a natural fiber textile. Unlike using other cotton fabric, like from a t-shirt, the jean is a thick fabric which gives the char cloth a little weight and structure. It allows you to have char cloth that is sturdy enough to carry around and use, without out it tear or falling apart.
The second material you need is a container. An easy one that you can use, which is what I used, is an Altoids tin. You get mints, and when your finished with the mints, you have a container to make your char cloth in. However if you're not a fan of mints there are other options out there that you can use as a container for this kind of project. Small (and clean) paint cans, and metal tins of any kind. The main thing you need is a container that isn't going to melt or burn, and is airtight.
The third thing you need for making char cloth is a nail and hammer. I'm sure your wondering what for. When you make char cloth, you need not an airtight container, but an almost airtight container. To make char cloth there needs to be one to two holes in your container. This is because as the tin heats up, air will expand and it risks blowing open your whole container and ruining your char cloth. It also gives a vent for smoke as well, giving you an idea of how done your char cloth is.
The final thing you need is your source of heat. Preferably you want a fire. This can be a fire in a fire pit outside or a fireplace. I used a gas fire place to make my char cloth, however I have heard of people making char even on stove. Whatever you use, you have to make sure that the heat will be enough for the fabric to burn.
To get started, your going to want to start with your container. Make sure your container is clean before anything else. Any kind of gunk and grime on the inside of your container can transfer to your char cloth which could create problems in the creation of the char cloth and its burning later on.
Once your container is clean, grab your hammer and nail and put at least one hole in your container. I would actually recommend putting two holes in your container, one on each end. When I made my char cloth, after a couple rounds of char cloth making, the hole got plugged. I wasn't sure whether I just packed the cloth in too tightly or if it was ash blocking up the hole.
Either way the result was the same. The air expanded in the container and popped the lid off my container. The influx of air into the container resulted in the cloth going up into flames almost instantly. So make sure that you have at least one hole in your container. At the same time, use a nail or a similar object, because you don't want your hole to be too big, because too much air means the fabric will burn rather than char.
Once your container is ready, get a hold of your fabric and trim it down into small swatches. Your char cloth doesn't need to be very large to work. The spark will hit the cloth, and the cloth will hold it for a good while so you can start your fire. The cloth won't go straight up in flames, so it doesn't have to be too big. The pieces of char cloth I made were around the size of postage stamps and a little longer, and it has provided plenty of char cloth to get a fire started.
With your container and fabric ready, it is time to get your source of heat ready and put everything together. Once your heat source is going, take pieces of your char cloth and layer it inside your container. You can put quite a few pieces in, however you want to keep it loose. If you have too many pieces of cloth stuffed in your container it will inhibit airflow between each piece of cloth. This means some pieces of fabric may end up being too well done and others under done.

You need to seal up your container and place it in/over your heat source. I found for my altoids tin it took approximately five to seven minutes for the char cloth to be complete. The time will vary depending on how much cloth you have in the container, how big the container is, and how hot your heat source is.
Once you container is heating up, you simply need to wait and watch. The main thing you will be watching is the smoke that will be coming out of the holes in your container. In the beginning you will have smoke billowing out of your hole. As your char cloth gets close to done the smoke will lessen and start to get wispy. Once the you have barely any smoke coming out of your container, you char cloth is ready to come off the heat.
Now, DON'T open your container right away. It will ruin all your work. For one, the container is going to be hot. Let it cool a couple minutes so you don't burn yourself opening it up. Also so you don't burn your char cloth in opening it up. For the same reason you don't want your container popping open while making your char cloth, you don't want to open it up right away. Air rushing into the container right after taking it off your heat will result in the char cloth igniting and you lose what you just made.

Once your container has cooled you can open it up and take your char cloth out. From here you can package it and place it with your survival gear, fire starting kits, in your emergency car kit, your hiking gear, and where ever else you can think that should have some. Of course you can also go a head and test it out and play with your newly made creation. If you use it all up, just make some more!
I know with the char cloth I made, I was surprised at how easy it was to make, and how well it worked. I tested mine out in a camping trip just a week ago. It was pretty breezy and I found that the char cloth was way easier to use to make my fires than the light I brought with me! So if you make some char cloth let us all know how it turns out and where you use it.
~Sara
No comments:
Post a Comment